|
Guided Fly Fishing in West Georgia FLINT RIVER SHOAL BASS - CHATTAHOOCHEE STRIPERS
LARGEMOUTH BASS & BREAM LAKES - GAR & CARP
|
||
|
Home Fishing Reports Locations & Species Tackle & Tactics Fly Box Guided Trips More |
||
|
The Tokyo Spider
That spider is terrific for average size bream - but I wanted something for the giant bream at Callaway, something I could see from a distance, and something big enough to entice not only the bream, but bass too. A Japanese sci-fi-movie spider, if you will, like "The Spider That Ate Tokyo"! Cast it as close to the bank or wood as possible, and let it sit a long time. How long? To quote Dave Whitlock, "Don't let the hook rust." Twitch it once and let it sit again. Because the foam is not tied down at the hook bend but kind of sticks up in the air, the fly still rides low in the water and can be worked with the little rippling twitches that bream (and bass) find so irresistible. But with the large mass of foam it can also create quite a disturbance on the surface with a hard strip - just the ticket if you're bream fishing slow and easy down the bank and suddenly see a big bass blow up.
|

|
|
|
Tying Instructions
Hook - #6 Gamakatsu SC15 or std. #8 dry fly hook Thread - 6/0, to match or contrast body Body - 2mm craft foam, long strips 3/8" wide Legs - medium rubber legs, solid color of choice
|
The Gamakatsu hook is a saltwater hook, but very light and small for a #6 - I like it, but a standard dry fly hook will work fine.
The legs are just round rubber - I'll tell you how to get the fancy stripes later.
The illustrations are in weird colors just to make the drawings clearer. Pick the colors you like, solid or contrasting.
|
|
|
|
Cut foam in long strips with a ruler and razor knife.
Lay down a good, tight thread base on the hook from eye to just above the hook point. These wraps should be very tight and even to prevent the fly from rotating on the hook shank as you tie or when fishing. You might add a drop of super glue to the wraps.
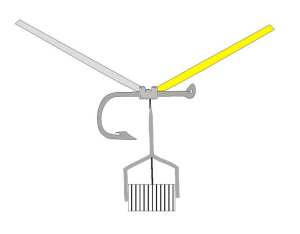
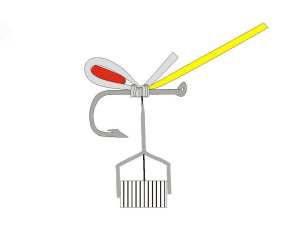
Attach two foam strips just in front of the hook point, one pointing back and one forward. In the drawing, the colors contrast but could be the same - your choice. The fly in the photo above uses black in the rear and yellow in the front.
|
|
|
|
Cut a short piece of the foam strip and round the corners with scissors. Attach it to the top of the rear-facing foam with a drop of super glue, leaving just a bit of space between its front and the thread wraps.
The photo above shows a spider with 2 short pieces stacked, the second being slightly smaller than the first. This give a little extra buoyancy and is good if you plan on using a weighted dropper. Or the filler foam can be omitted if you want a lower-floating fly.
Again the color is your choice, match or contrast.
|
|
 |
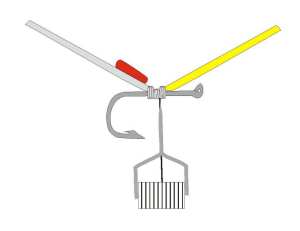
Fold the rear-facing foam forward and tie down on top of the previous wraps. The rear body should extend just beyond the rear of the hook and not crush the short foam filler. You may want to add drop of Super Glue.
Advance thread to hook eye, dubbing if desired.
|
|
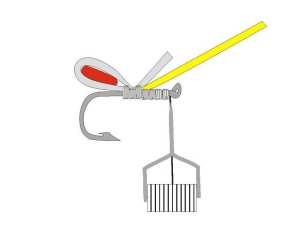 |
Advance the thread under the fly foam to the hook eye. |
|
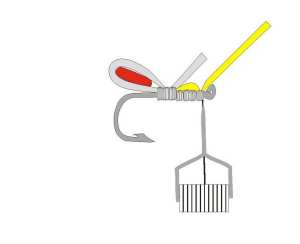 |
Pull the original forward-facing foam down and tie down of the hook eye. Half-hitch the thread or add a drop of super glue.
|
|
 |
With a soft wrap, move the thread back to the mid-hook point. Make one wrap without much pressure here, and then tighten down on the next. The thread crossing the bottom layer of foam will not be visible from underneath and will be protected from above momentarily.
Trim the upper layer of foam (originally the rear-facing) even with the hook eye, slightly rounding the front corners.
|
|
 |
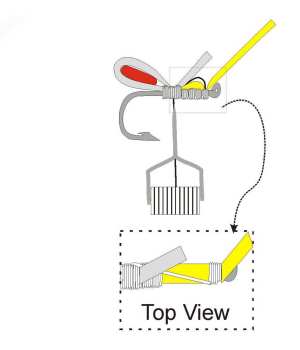
Fold the top-layer of foam back, trapping the mid-layer, and tie it down at the mid-point. Trim to desired length and add a dot of paint for an indicator, if you like (see top photo).
If you have used contrasting colors, the mid-layer will give the general appearance of an eye. The mid-layer does not need to be tied down in front as it is captured by the top layer of foam.
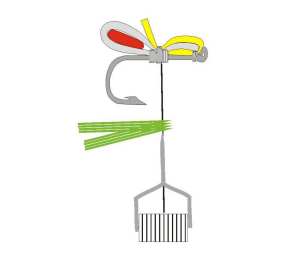
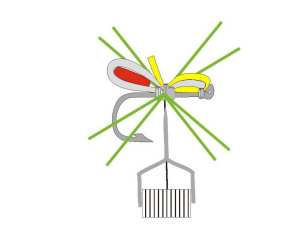
Tie in the rubber legs. I like to fold the legs over the thread, wrap twice then pull the legs into position. I want 4 legs to the side, so I use 4 strips of rubber (which become 8 legs).
|
|
 |
I use rubber legs pieces that are about 3 1/4" long. This results in legs that are over 1 1/2" long They do occasionally foul on the hook, but I think the extra action they give is worth the trouble. My buddy Paul convinced me this was the case. I had given him a one of the original prototypes and he caught a lot of fish on it. I thought the fly had long legs already (about an inch), but he said , "Make `em longer." I did and I liked it!
|
|
|
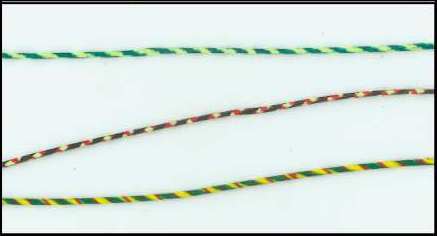
The fancy striping on the rubber legs is a trick I learned from Ward Bean . Tie in solid-color legs as usual. Pinch the end of the leg between your thumb and forefinger, and twist and stretch them. Run a magic marker down one side and release. Voila! - a barber-pole stripe in your choice of colors. Add a second color if you want. Twist in the opposite direction and the stripes will criss-cross.
|
|
|
|
|
||
| C o n t a c t K e n t at kent@flyfishga.com or 7 0 6 - 8 8 3 7 7 0 0. | ||
|
| ||
 The traditional foam spider has always been a killer
bream (sunfish) fly. In it's traditional form, it is tied on #10-#12 hooks with
a small bit of foam and floats low in the surface film.
The traditional foam spider has always been a killer
bream (sunfish) fly. In it's traditional form, it is tied on #10-#12 hooks with
a small bit of foam and floats low in the surface film.